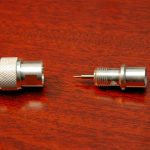
 The N-Connector comes in 2 parts that screw together. You’l need to unscrew them and we’ll be starting by using only the inside housing. The N-Connector comes in 2 parts that screw together. You’l need to unscrew them and we’ll be starting by using only the inside housing. |
The first thing you’l want to do is cut the end of the coax so it’s nice and square. no crooked cuts. 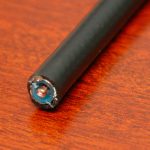 |
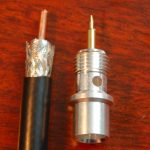 Then cut back the insulation and braided shield. Be sure to be careful to not cut or nick the center conductor. Remember that radio waves travel on the outside layer of the center conductor also known as the “skin effect” and we don’t want to disturb that. Be sure to leave enough of the center conductor to go to the end of the N-Conductor center pin minus the tapered part. leaving the center condustor too long will result in the braid not being exposed through the side ‘windows’. which will be required for soldering. Also, be sure to cut back the outside insulation the minimal amount to allow for maximum grip by the N-Connector housing. Then cut back the insulation and braided shield. Be sure to be careful to not cut or nick the center conductor. Remember that radio waves travel on the outside layer of the center conductor also known as the “skin effect” and we don’t want to disturb that. Be sure to leave enough of the center conductor to go to the end of the N-Conductor center pin minus the tapered part. leaving the center condustor too long will result in the braid not being exposed through the side ‘windows’. which will be required for soldering. Also, be sure to cut back the outside insulation the minimal amount to allow for maximum grip by the N-Connector housing. |
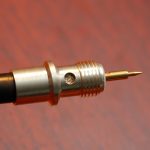 Screw the N-Connector to the coax, the threads inside the N-connector will grip the outside insulation of the RG-8 coax. when it’s threaded all the way on you should be able to see the braided shield through the holes of the N-Connector housing as well as see the copper center conductor through the small hole in the N-Connectors copper tip. Screw the N-Connector to the coax, the threads inside the N-connector will grip the outside insulation of the RG-8 coax. when it’s threaded all the way on you should be able to see the braided shield through the holes of the N-Connector housing as well as see the copper center conductor through the small hole in the N-Connectors copper tip. |
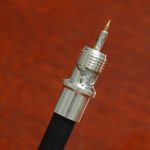 Before soldering, it’s a good idea to use a multi-meter to make sure there isn’t a short between the center conductor and braided shield. Solder the braided shield to the N-Connector housing. Make sure the housing gets hot enough the let the solder flow into the holes and bonding to the braided shield. Then heat up and center conductor pin and put a small amount of solder through the hole in the N-Connector center pin. Before soldering, it’s a good idea to use a multi-meter to make sure there isn’t a short between the center conductor and braided shield. Solder the braided shield to the N-Connector housing. Make sure the housing gets hot enough the let the solder flow into the holes and bonding to the braided shield. Then heat up and center conductor pin and put a small amount of solder through the hole in the N-Connector center pin. |
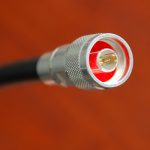 When the N-Connector cools down, Screw on the outside section of the N-Connector then terminate the N-Connector to the equipment of your choice. When the N-Connector cools down, Screw on the outside section of the N-Connector then terminate the N-Connector to the equipment of your choice. |